

The Mirror was taken from Google Maps - http://www.google.co.uk/imgres?imgurl=http://www.halle.co.uk/siteFiles/images/p_theatre_mirror.jpg&imgrefurl=http://www.halle.co.uk/p_sat17apr10.asp&usg=__Mya1odTYo7BUEDJsbfQq_FS4NDc=&h=420&w=361&sz=33&hl=en&start=18&zoom=1&itbs=1&tbnid=6cDjXUXO-zC1YM:&tbnh=125&tbnw=107&prev=/images%3Fq%3Dmirror%2Bwith%2Blights%26hl%3Den%26safe%3Dactive%26sa%3DN%26gbv%3D2%26ndsp%3D20%26tbm%3Disch&ei=eo-VTcWjOI7Hswa2tKWZBQ
The Lips were taken from Deviant Art (Resources and Stock/PNG File) (http://browse.deviantart.com/resources/?qh=§ion=&q=ohsheisgaga#/d3aj3ml)
The Text is written in Broadway.
Here is how I made it from the original to the one above.

I upload the image into Photo Impact 10 (A software already installed onto my computer, I have used this software for my own personal use e.g. Fan Art for Deviant Art and I have self taught myself to use the effects and how they work and what they do.) I wanted to make the picture brighter and make it look as thought the lights are brighter and are actually ting up the wall and the mirror. Go to Effect - Lighting - Lights

The Lights editing box appears. This allows you to position the direction of the light, how strong it is (Light), the Exposure, Ambiance, Skew (put the light on a slant, not parallel or twist), Spread of the light (high and wide the light is), Distance of the light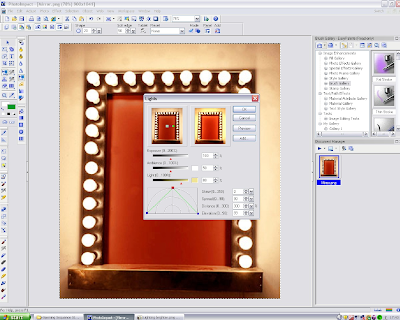 , Elevation and add another layer of light.
 , Elevation and add another layer of light.
 Has you can see I have not adjusted it yet, the Red Square is connected with a Green Ling
to two other Blue Squares. The Red Square represents the position, how high or how low the light is and the Green line attached to the Blue Squares represents the direction of the light and how wide it is.
As you can see here I have moved the Red Square to the top, where it can spread the light better and I have moved the Blue squares down across to the bottom corners so the light reaches further and covers the picture better.

Here is the final lighting effects done. I am pleased with the outcome and all I need to do now is look at the finishing touches, the Font the Lips Picture.

I add the text by clicking on the Text button, scroll down on the list of texts to get to Broadway and choose my font size and keep the colour Black. After typing in Stage Girls I rotated the text on a slant. I found I couldn't slant it so I opened I saved the file and opened it up in Microsoft Picture it! 9 (the programme is already opened at the bottom in the screenshot, this is where I also placed the PNG Picture, I find some aspects of editing in this software easier and simple than those in Photo Impact 10)
No comments:
Post a Comment